Large sliding glass patio doors and oversized patio door systems have a way of transforming a home. They pull in natural light, open up sightlines to outdoor areas, and create that seamless indoor-outdoor flow that so many homeowners love. But unlike a standard door replacement, installing a large or multi-slide patio door involves an intricate installation process, especially when it means creating a new or wider opening.
The good news: you don’t need to figure most of this out on your own. Many expert installers handle the structural evaluation, opening preparation, permitting, and installation from start to finish. What you need is enough understanding of the process to ask the right questions, set realistic expectations, and feel confident in your decisions. This guide walks you through what a professional large patio door installation actually involves and what your role as a homeowner looks like at each step.
What Is a “Large” Sliding Glass Patio Door?
Standard patio doors typically span five to eight feet in width. Once you move beyond that range, you’re in the territory of large sliding glass patio doors and multi-slide patio door systems.
The wider the system, the more involved the installation process is. Larger openings require structural header work, heavier and more complex hardware to support the panel weight, and greater precision in leveling and track alignment across a wider span.
Step 1: The Free In-Home Consultation
Whether you’re replacing an existing oversized patio door or creating a brand new opening, any large sliding door project should start with a complimentary, no-pressure in-home consultation. During the visit, your consultant should:
- Inspect your existing doors and surrounding wall conditions, or evaluate the wall where a new opening is planned, depending on your project.
- Answer your questions about materials, energy efficiency, configuration options, and what the installation process involves.
- Take rough measurements of your existing opening or evaluate the wall where a new opening is planned.
- Recommend door system options based on your home, goals, and budget.
After the visit, you should receive a clear, detailed estimate that gives you everything you need to make an informed choice.
Questions to Ask During Your Consultation
Going into your consultation prepared helps you get the most out of it. Here are some questions you can ask:
- “Do you handle the structural work for new or expanded openings, or do I need to hire a separate contractor for that?”
- “Which door systems do you carry for large openings, and what are the differences between them?”
- “What does your installation warranty cover, and for how long?”
- “Will you handle the permit application, or is that my responsibility?”
- “What’s the realistic timeline from consultation to completed installation for a project like mine?”
- “What will the finished exterior look like, and how will the trim and siding repair be handled?”
- “What maintenance does this system require, and what’s covered under the product warranty?”
A qualified installer will answer all of these questions clearly and without hesitation. If the answers feel vague or incomplete, that’s worth paying attention to.

Schedule a Free Consultation
Get a free home window inspection, talk with one of our design consultants to get product recommendations, and learn about special offers and financing.
Step 2: Choosing Your Door System
Once the site evaluation is complete, your installer will recommend specific door systems that fit your opening, your home’s style, and your performance needs.
| Door Type | Typical Width | Best For |
| 2-panel sliding (standard replacement) | 5-8 ft | Smaller patios, decks, and bedroom access |
| 3-panel sliding | 9-12 ft | Mid-size living rooms connecting to a patio or deck |
| 4-panel sliding | 10-16 ft | Large living and dining areas with wide wall spans |
| Stacking, bi-fold, and pocket glass wall systems | Up to 36 ft | Indoor-outdoor entertaining spaces |
The right door style depends on your opening size, how you plan to use the space, and how much of the wall you want to open up. Here’s how the main configurations compare:
Two-, Three-, and Four-Panel Sliding Door Systems

Sliding door systems are available in two-, three-, and four-panel configurations. Two-panel doors are the most common, with one fixed panel and one that slides, or both panels sliding as in a double-sliding configuration. They are best suited for standard openings of five to eight feet.
Three-panel systems add a fixed panel to create a wider opening without requiring the full wall span of a four-panel system, making them well-suited for mid-size living rooms and dining areas.
Four-panel systems are designed for openings of ten feet or more, with two sliding center panels and two fixed outer panels that create a broad, symmetrical entryway connecting indoor and outdoor spaces.
Bi-Fold Doors

Bi-Fold doors include multiple panels connected by hinges that fold accordion-style and stack to one side when open. It creates a wide, unobstructed opening and works well where the full width of the wall needs to be accessible.
Pocket Doors

Pocket door panels slide horizontally and disappear completely into a recessed cavity within the wall. It provides a fully unobstructed opening with no visible stacked panels, making it the cleanest look of the three glass wall options. However, it often requires wall modification to accommodate the pocket.
Stacking Doors

Stacking doors involve multiple panels that slide along a track and stack neatly to one side when open, with panels that remain visible when stacked. They are similar to a bi-fold in their opening width, but without the folding hardware.
Step 3: Choosing Your Door System’s Details
Once you’ve identified the right door configuration, your installer will help you work through the specification details that determine how your door looks, performs, and holds up over time. Frame material, glass package, and finish are the three main decisions, and each one has meaningful implications for energy efficiency, maintenance, and long-term durability. Your installer should walk you through the options that make sense for your configuration, climate, and budget.
Frame Material
The most common frame materials for large sliding glass door systems are vinyl, fiberglass, and aluminum.
- Vinyl is cost-effective and low-maintenance, making it a practical choice for homeowners focused on value.
- Fiberglass offers superior durability and energy performance, holding up well under the demands of larger panel sizes and more extreme temperature swings.
- Aluminum delivers slim sightlines and excellent structural strength across wide spans, and is a natural fit for modern and contemporary homes.
Glass Options
Your installer will recommend glass packages appropriate for your climate and the direction your door faces. For Pacific Northwest homes, this typically means Low-E coatings to manage heat transfer, dual- or triple-pane construction, and argon gas fills between panes. For south- or west-facing installations with significant sun exposure, your installer may also recommend enhanced solar control coatings.
Size and Finish
Large sliding and stacking glass wall systems can often be custom configured up to 36 feet wide and 10 feet high. A wide range of standard frame colors and custom finishes are available, and your installer will show you samples to help you find a combination that complements your home’s existing exterior and interior.
Step 3: Permits and Timeline
Large door projects, particularly those involving new or expanded openings, almost always require a building permit. Your installer should handle permit applications, coordinate any required structural drawings, and manage the inspection process. A qualified installer will give you a realistic schedule during your consultation and keep you updated as the project progresses.
Step 4: Preparing the Wall
Many homeowners assume that getting a large sliding or glass wall system requires an existing large opening. It doesn’t. A qualified installer can work from three different starting points:
- Replacing an existing large door or multi-panel system with a new one
- Converting an existing window opening into a full glass door system
- Creating an entirely new wall opening where no door or window currently exists
Creating or Expanding Your Opening
Creating or expanding an opening involves framing, structural header work, exterior modification, and finish work on both the interior and exterior. It’s a more involved project than a straight replacement, but it’s also how homeowners achieve the dramatic, wall-of-glass results.
Opening Size and Configuration
Your installer will measure and evaluate your rough opening, the framed gap in the wall structure into which the door frame is set before any trim or casing is applied.
- For standard sliding doors, rough openings are typically two to four inches wider and two to two-and-a-half inches taller than the actual door unit size to allow for shimming, plumbing, and leveling.
- For stacking glass wall systems, tolerances are tighter, with the rough opening typically just one-half to one inch wider and one-half to three-and-a-quarter inches taller than the total unit size.
Your installer will confirm the exact requirements based on the specific manufacturer and system you select.
Structural Conditions
Before any large door can go in, your installer needs to understand what’s inside and around your wall. This is the part of the process that surprises some homeowners, and it’s exactly why professional assessment matters.
- Load-bearing walls: Many of the walls best suited for large glass door systems are load-bearing, meaning they carry structural weight from above. Installing a wide opening requires a properly engineered header to span the gap and transfer that load to the posts on either side.
- Utilities in the wall: Electrical wiring, HVAC ducts, and occasionally plumbing lines can run through exterior walls and may need to be rerouted before framing work begins.
A qualified installer will identify all of these conditions during the site visit, coordinate any structural or trade work needed before installation begins, and account for your wall’s specific dimensions when selecting and ordering your system. None of these are obstacles. They’re just details that need to be surfaced early and planned for correctly.
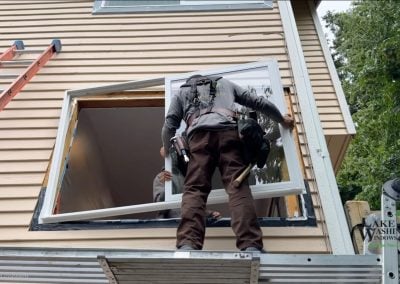
Step 5: The Installation Process

Once the rough opening is framed and ready, the installation of your door system follows a defined sequence. Here’s what to expect:
- Sill pan and flashing: A rigid sill pan is installed and flashed before the door frame goes in. This is one of the most critical steps for long-term performance, managing any water that reaches the base of the door and directing it away from your home’s structure.
- Frame installation and leveling: The door frame is set into the opening and leveled with precision. On large systems, even small variations in level affect how panels track and seal across the full width of the span.
- Panel installation and adjustment: Glass panels are set onto their tracks and adjusted for smooth, consistent operation. On large systems, panels can be substantial in weight, and proper adjustment at this stage is what determines how the door feels every day.
- Sealing and exterior finishing: All joints are sealed using commercial-grade sealants, and exterior trim is installed and finished to blend with your home’s siding.
- Interior finishing: Interior trim is installed and finished to match your interior. Any patching or painting required from opening work is completed.
- Final walkthrough: Your installer tests every panel through its full range of motion, demonstrates lock operation, and walks you through basic care and maintenance for your new system.
Step 6: How Your Installation Is Protected
A large door system is only as good as the installation behind it. The most common failure points aren’t the doors themselves, but the details around them. An improperly prepared sill, a gap in the flashing, a sealant joint that wasn’t applied in the right sequence, determines whether your investment performs for decades or becomes vulnerable to hidden water damage.
The best installers treat weatherproofing as a structured, multi-layer system rather than a final step. That means starting below the opening with a protective membrane at the sill, shielding the top of the frame from direct water exposure, embedding the door frame into high-performance sealant before it’s set, and reinforcing the flange and perimeter after installation. Each layer works together to manage moisture at multiple points, so no single failure can compromise the whole system.
When evaluating installers, ask specifically how they waterproof a door opening and whether that process is backed by a written installation warranty that covers workmanship separately from the manufacturer’s product warranty. The answer tells you a great deal about whether they take these details seriously.
Step 7: What to Expect After Installation
Once your new large sliding glass door or glass wall system is installed, there’s a brief settling-in period worth knowing about. Here’s what’s normal, what to watch for, and how to keep your system operating smoothly for years to come.
The First Few Weeks
Large door panels, particularly on stacking and multi-slide systems, may require minor roller or track adjustments in the first weeks after installation as the frame settles and the home’s framing acclimates to any changes made during the project. This is expected. If your panels feel slightly stiff or don’t latch as cleanly as they did on installation day, contact your installer. Minor adjustments are a routine part of the post-installation process and should be covered under your installation warranty.
Understanding Your Warranties
Your large door system comes with two distinct warranties worth understanding. The product warranty covers defects in the door, glass, hardware, and finishes. Coverage periods and terms vary by product line and manufacturer, so ask your installer for the specific documentation at the time of installation.
The installation warranty is separate and covers the workmanship of the installation itself, including the flashing, sealing, framing work, and weatherproofing. If an installation-related issue arises, a leak at the sill, a frame that shifts, a seal that fails, that should be on the installer, not the manufacturer.
Ready to See What’s Possible in Your Home?
A large sliding glass door or stacking glass wall system is one of the most impactful upgrades a homeowner can make, but it’s also one of the most involved. The right system depends on your opening size, your home’s structure, and how you plan to use the space. The right installer handles the structural assessment, the permitting, the opening work, and the installation itself, and backs all of it with a warranty that covers the workmanship, not just the product.
At Lake Washington Windows & Doors, we specialize in large sliding glass doors and stacking glass wall systems for Western Washington homeowners, including projects that require creating or expanding an opening. We carry premium systems from Milgard Windows & Doors and WinDor Systems, and back every installation with our Leak Armor™ Lifetime Installation Guarantee.
Schedule your free in-home consultation today. Our design consultants will evaluate your space, walk you through your options, and give you a clear picture of what your project involves, with no pressure and no guesswork.