If you want your new windows to perform over time, they must be installed correctly. If they aren’t, even high-quality replacements can drastically underperform, leading to drafts, water intrusion, poor insulation, and premature wear.
Many homeowners consider installing their own replacement windows rather than hiring a professional to reduce upfront costs. While the lower price of a DIY window installation is tempting, it is a major risk. Installing a window yourself can lead to hidden rot, mold, and voided warranties, which often cost far more to fix than the money you save on labor today.
This guide explains the technical and financial dangers of window replacement projects, why professional work is usually the only way to protect your property, and the rare cases where doing it yourself might be okay.
Comparing Professional vs. DIY Window Installation in Detail

Deciding whether to tackle a window replacement yourself or hire an expert requires a careful look at your technical ability and risk tolerance. While a DIY project offers immediate control over your budget and schedule, it also places the full project burden on your shoulders. The following comparison breaks down the trade-offs to help you determine the most responsible choice for your property.
| Consideration | Professional Installation | DIY Installation |
| Upfront cost | Higher initial investment | Lower upfront cost |
| Long-term cost | Often lower due to fewer repairs | May increase if mistakes require repair |
| Tools and skills | Have specialized equipment and training | Requires construction knowledge |
| Water management | Integrated flashing and sill systems | High risk of improper drainage |
| Energy performance | Optimized sealing and insulation | Performance depends on installation quality |
| Warranty protection | Protects product and labor warranties | Risk of voided product warranties |
| Code compliance | Meets local requirements | Risk of non-compliance or missed permits |
| Liability & safety | Fully insured and bondable crews | Homeowner assumes 100% of the risk |
| Structural discovery | Experts identify and repair hidden rot | High risk of sealing in existing damage |
| Resale value | Documented professional upgrades | Often viewed as unverified by inspectors |
| Project pace | Efficient completion; minimal disruption | Time-consuming; home stays open longer |
Upfront vs. Long-Term Investment
While DIY installation saves you labor costs and reduces your initial bill, professional installation acts as a form of insurance. A single error in measurement or sealing can lead to “hidden” costs, such as drywall repair, framing rot, or mold remediation, that quickly exceed the money saved by skipping professional installation.
Specialized Tools and Technical Skill
Professional crews arrive with commercial-grade equipment, including industrial vacuums, precision leveling tools, and high-performance sealants not usually found at big-box hardware stores. DIYers must invest in these specialized tools and possess the knowledge to handle unforeseen issues, such as discovering rotted structural studs once the old window is removed.
Critical Water Management
In high-moisture climates, the most dangerous risk of DIY is failing to properly integrate the window into the home’s “drainage plane.” Professional installers use a layered approach with sill pans and specific flashing sequences to ensure water is shed to the exterior, whereas a single DIY mistake can allow or trap moisture inside the wall, leading to rot and structural decay.
Energy Performance and Air Sealing
The most expensive, high-efficiency window is useless if air can leak through the perimeter. Professionals use specialized low-expansion foams and backer rods to create a permanent airtight seal, while DIYers often struggle to balance the insulation, either leaving gaps that cause drafts or over-filling the gap, which can bow the window frame and prevent it from opening.
Warranty and Liability Protection
Manufacturer warranties are often conditional, with many top-tier window companies only honoring a claim if the unit was installed according to their strict engineering standards. Choosing professional installation keeps these warranties intact and provides an additional labor warranty, ensuring that if a leak or operational issue develops, the contractor is responsible for the repair expenses, not you.
Building Code and Safety Compliance
Window replacement often involves local building permits and strict “egress” codes, which dictate the minimum size for windows in bedrooms to ensure fire safety. Professional teams handle the permitting process and ensure that every unit meets legal safety requirements, protecting you from fines or the need to repeat the project before you can sell your home.
Liability and Personal Safety
Professional companies carry workers’ compensation and liability insurance, protecting you from financial responsibility if an installer is injured or property is damaged during the project. A DIY installer assumes all these risks.
Structural Integrity and Hidden Damage
One of the greatest risks of a DIY installation is the “out of sight, out of mind” trap. When a professional crew removes an old window, they perform a complete check of the rough opening for signs of rot, mold, or pest damage. A DIYer often lacks the experience to spot these red flags and may inadvertently leave an existing issue inside the wall, where the eventual repair costs will be far higher than the initial cost of professional labor.
Resale Value and Documentation
Professional window replacement is a major home upgrade that homebuyers and inspectors view much more favorably when backed by a professional invoice and a transferable warranty. DIY work is often scrutinized during the selling process, and a lack of professional documentation can lead to aggressive price negotiations or requests for expensive “verification” inspections before a deal can close.
Project Speed and Daily Disruption
While DIY projects allow you to set your own schedule, they often take much longer than originally expected and cause significant disruption in your life. Professional crews are built for speed and efficiency, typically completing an entire home installation in a fraction of the time it takes a single homeowner. Choosing the professional route ensures your home is resealed and secured by the end of the day, whereas a DIY project often leaves window openings vulnerable for multiple weekends.
The Financial Risk of DIY Window Installation
Many homeowners choose DIY to “save” the cost of professional labor. However, you only save when the installation is flawless. If you make a single mistake in the waterproofing or structural alignment, the repair costs can easily triple the original quote for professional work. Here’s a hypothetical example to illustrate the potential consequences of installing just one window incorrectly:
| Cost Component | Professional Installation | DIY Installation (No Mistakes) | DIY Installation (With Mistakes) |
| High-quality window unit | $900 | $900 | $900 |
| Materials | Included | $150 | $150 |
| Expert labor fee | $450 | $0 | $0 |
| Warranty protection | Full coverage | Product only | None (voided) |
| Repair: water rot remediation | $0 | $0 | $4,500 |
| Repair: interior drywall/paint | $0 | $0 | $800 |
| Repair: professional re-install | $0 | $0 | $650 |
| ESTIMATED TOTAL COST | $1,350 | $1,050 | $7,000 |
In this scenario, a successful DIY installation saves you roughly $300, but those savings come at a massive risk. If a single mistake is made with the flashing or sealants, you could end up facing a $5,750 home improvement project, repairing structural rot, mold, and professional remediation. Choosing professional installation eliminates this gamble, ensuring your home is protected without the threat of a catastrophic repair bill later on.

Schedule a Free Consultation
Get a free home window inspection, talk with one of our design consultants to get product recommendations, and learn about special offers and financing.
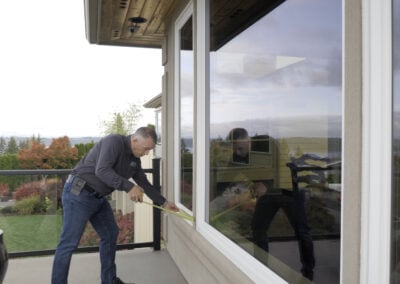
What the Window Installation Process Really Involves

Many homeowners consider the DIY route because the physical act of “swapping out” a window sounds like a straightforward weekend project. However, once the old unit is removed, the process quickly becomes a complex mechanical operation that requires precise execution to keep your home airtight and dry. Here’s everything a typical window replacement process actually involves:
- Careful removal of exterior and interior trim: Installers must pry away casing and moldings without splintering the wood, cracking the surrounding drywall, or damaging the exterior siding.
- Safe extraction of the existing window: The old frame must be cut and pulled from the opening without warping the structural studs or disturbing the original weather-resistive barrier.
- Forensic inspection of the rough opening: Once the unit is removed, the exposed wood must be checked for hidden rot, mold, or pest damage that could compromise the new window if sealed inside the wall.
- Surface preparation and decontamination: All old sealants, fasteners, and debris must be scraped away to create a pristine, flat surface that allows new flashing and adhesives to bond at a molecular level.
- Installation of sill protection and flashing: Layered moisture barriers must be applied in a specific, “shingled” sequence to ensure that gravity pulls water away from the house rather than trapping it against the framing.
- Precise placement, leveling, and shimming: The unit is adjusted until it is square, level, and plumb within a fraction of an inch to prevent the frame from twisting, which would cause the window sashes to stick.
- Secure fastening to manufacturer specifications: Fasteners must be driven into specific points with exact tension to allow the window to expand and contract with the weather without warping the frame.
- Insulation of perimeter gaps: Specialized low-expansion foams must be applied carefully to eliminate drafts; overfilling this gap can exert enough pressure to crush the frame and prevent the window from opening.
- Structural weatherproofing and exterior sealing: A consistent bead of high-grade sealant is applied to ensure it can handle years of sun and rain without peeling away from the joints.
- Interior finishing and operational testing: The final step involves reattaching the trim and performing a stress test on the locks, latches, and balances to ensure the window operates smoothly on day one.
How to Choose a Professional to Install Replacement Windows

If you decide that the risks of a DIY project outweigh the savings, the next step is finding a contractor who prioritizes structural integrity over a fast turnaround. Because even the highest-quality windows will underperform if they are installed incorrectly, you need a team that views installation as a science.
- Verify current licensing, bonding, and insurance: You should only work with an installer who is fully licensed and insured in your state to ensure you are protected from liability for property damage or onsite injuries.
- Look for a proven track record of local experience: Choose a company with deep experience in your specific region, as they will understand the unique climate challenges and local building codes that affect window performance.
- Inquire about specialized installation systems: The best installers go beyond standard methods by using advanced sealing and flashing systems to provide extra protection against water intrusion and air leaks.
- Check for certified and background-checked crews: Ensure the people entering your home are factory-trained professionals who follow a consistent, documented process rather than a rotating crew of subcontracted laborers.
- Prioritize companies that catch hidden issues: Your installer should perform a thorough inspection of the rough opening during the process to identify and repair any existing rot or framing damage before the new window is sealed.
- Confirm the existence of a clear labor warranty: While most windows come with a manufacturer’s product warranty, you need a written guarantee on the workmanship to ensure the company stands behind the quality of their installation for years to come.
Protect Your Home with Expert Window Installation
Ultimately, window installation is a significant investment where the cost of a single mistake can far exceed the initial savings of a DIY project. By choosing an expert team, you avoid the potential costs of water damage and the frustration of windows that stick or leak, ensuring the total cost of your project remains as low as possible over time.
If you are a Seattle-area homeowner ready to upgrade your home’s comfort and protection, our team is here to provide professional expertise to help you get the job done right the first time. Schedule a complimentary in-home window consultation to discuss your project, evaluate your current windows, and learn more about our specialized installation process. Let us show you how professional craftsmanship and our exclusive Leak Armor installation can provide the lasting peace of mind your home deserves.